
 In Armada you are able to issue commands to each capital ship. These provide direct tactical benefits and Fantasy Flight Games has come up with a simple and elegant way of implementing command & control delay that exists when hundred or thousands of individuals are involved. Larger ships must plan turns in advance, but you aren’t punished too much if you chose a command 2 turns ago that doesn’t help that much now. You are allowed to bank that command as a token to be used for a lesser effect later.
Looking at the effect of each command and its corresponding token has revealed an interesting difference in efficiency in comparing the same command usage on different ships. Any command is useful in the right situation, efficient or not, and in many cases will be situational. It doesn’t matter if your firepower is increased by 100% or 33% if that extra oomph is what destroys an enemy ship. I am not advocating that you exclusively or even usually use a set command for a set ship, I am simply trying to draw attention to this detail.
 Concentrate Fire. The full command allows you to add one die to one of your attacks. The token provides a reroll of one die during an attack. Since the benefit of each is static there is more efficiency in using this command or token on a low fire power ship.
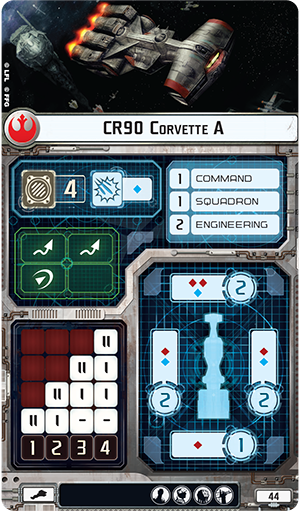
Example, for a long range engagement: a CR90a Corvette has two red attack die forward. If you use the Concentrate Fire command you up your potential damage output by 50%. A Victory-I Star Destroyer on the other had has three red attack die forward, thus if you use the concentrate fire command you increase your potential damage by 33%. The same sort of efficiency is in effect when you use a token for a reroll. Now that is comparing the same additional die on each ship. If on the other hand if you are at close range adding an extra black die to the Victory’s forward attack the increase in efficiency is now even less (17%), however you may have just one-shoted that Corvette, so efficiency is not everything.
 Repair. The full command gives you repair points equal to your ship’s engineering value. The token provides half(rounding up) your ship’s engineering value in repair points. It costs 1 point to shift a shield from one facing to another, 2 points to regenerate a shield, and 3 points to remove a damage card. This benefit scales with the engineering value, the bigger the engineering value the more points you will have. Therefore, this command will be more efficient on high engineering ships.
Example, we will keep the same two ships: The CR90a has an engineering value of 2, with the command along this ship can only regenerate 1 shield. The Victory-I on the other hand with its engineering value of 4 will be able to regenerate 2 shields a 100% more efficient than the Corvette. The same applies for the tokens as the Corvette has 1 point and the Star Destroyer has 2 points. An interesting situation applies to odd value engineering ships the Gladiator Star Destroyer and the Nebulon-B Frigate for example. Each gets 2 repair points via token, almost as much as the full command. So in odd value situations, tokens are increasingly efficient.
An interesting point to bring up, generally it appears that the bigger and more expensive the ship the higher the engineering, the higher the standard fire power, and a higher hull & shield value. So an interesting dichotomy appears, cheap, low fire, low hull/shield ships are more efficient with Concentrate Fire and expensive, high engineering, high hull/shield ships are more efficient with Repair. Now this is not the end all be all, as having your Star Destroyer repair every turn will do you no good if your opponent kills all your other ships first or if your Corvette had only regenerated that one shield, it may not have gotten that crit that blew it up.
 Squadron. The full command allows you to activate X number of squadrons during the ship phase that may both move and attack (not normally possible during the squadron phase). X in this case is equal the ships Squadron value. Now the token will allow you to active 1 squadron to both move and attack. This command scales with the command itself and does not scale with it’s token.
Example: An Assault Frigate Mark II B has a squadron value of 3 and thus gets to utilize the command 300% more than the CR90 Corvettes with their squadron value of 1. With the token there is equal effect of a single squadron each. The Corvette is less efficient than the Assault Frigate when the command is used, but the reverse is true for the token. The Squadron command/token has a split efficiency in comparison to the Concentrate Fire and Repair command/tokens.
 Navigate. The full command allows you to increase or decrease your speed by 1 as well as gain an additional “click” (22.5 degree turn) during the ships movement. The token allows your ships to simply increase or decrease speed. This command/token does not scale with any set value, but is slightly more efficient a command for less maneuverable ships.
Example: A Victory Star Destroyer only gets 1 click at speed one and at speed two still only gets 1 click (at the 2nd bracket of the maneuver tool). So regardless if the Destroyer speeds up, slows down, or stays the same speed that extra click provided by the command increases the ship’s turning capability by 100% (22.5 to 45 degrees). A CR90a Corvette on the other hand with its 2-4 clicks(45 to 90 degrees) will only increase its turning efficiency by 25%-50%. So in regards to turning the Navigate command is more efficient for more ponderous ships. The ability to change speed is always more useful if your ship can take advantage of it, as the Victory can only get up to speed 2, trying to go any faster would be a waste. The Corvette on the other hand can take advantage of getting up to speed 4 and than back down again if the situation warrants it.
It certainly appears to me that the differences in the commands and tokens were planned out by FFG. The “attack” and “defend” command/tokens are more efficient on opposite spectrums of ships. The Squadron & Navigate command/tokens are somewhat split down the middle. A nice balance from a pure numbers standpoint. In the end with the command stack requiring most ships to plan in advance, efficiency I imagine will be secondary to the ability to issue the right command 3 turns ago.


